Using Ruby/Rake/Albacore to Create and Deploy Nuget Packages March, 2011
Ruby/Rake/Albacore is a top notch build and deployment stack. If you aren't familiar with it take a look at this quick start guide. As of version 0.2.3 Albacore offers a couple of tasks to aid in the creation of Nuget packages. We'll cover how to create and deploy Nuget packages using these tasks. The following assumes that the build script will be run on a build server but you can easily adapt it to run locally. It also assumes that the build server establishes a working folder for the source code and scripts when the build runs.
Installing Ruby/Rake/Albacore
If you haven't already, you will need to install either Ruby or IronRuby. After running the installers you should be good to go.
Installing Rake is simply a matter of running (i)gem install rake:
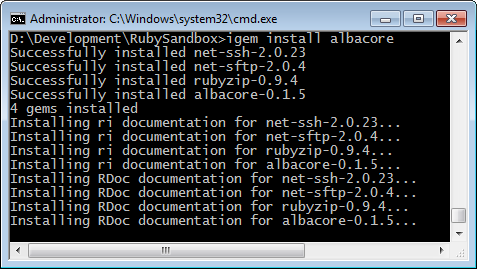
Installing Albacore is simply a matter of running (i)gem install albacore:
Nuget Gallery
If you want to publish your package to the Nuget gallery you will need to follow the steps below:
- If you haven't already, setup a gallery account here. Once you verify your email you'll be able to login and continue.
- Next you will want to reserve your package name. To do this click on the "Contribute" tab. Next click on the "Register Package Id" link. Here you can enter the id of the package you want to publish and it will be reserved for you. The documentation states the following about package ID's: "Package IDs may not contain any spaces or characters that are invalid in an URL. In general, they follow the same rules as .NET namespaces do. So "Foo.Bar" is a valid ID, "Foo!" and "Foo Bar" are not."
- Now you will need to note your access key which you will use later on. This can be viewed by clicking the "MY ACCOUNT" link in the upper right corner. There you will see your access key which is just a guid. If it is compromised you can generate a new one here.
Package Prep
The next thing we'll need to do is setup a folder that will contain the contents of the package. Under the build server working folder we'll have our script dynamically create the following structure:
/deploy
/package
/lib
Everything under the "package" folder will be the contents of the Nuget package. Nuget has a number of conventions for the folder structure that you can read about here. But to keep it simple we'll only cover the convention for deploying an assembly that does not target a specific version of the .NET framework. In that simple case we can just place the binaries from our project under a folder called "lib" (the following code makes use of this module, filesystem.rb, for file system operations):
require "albacore"
require "release/filesystem"

# ... Other tasks ...

desc "Prep the package folder"
task :prepPackage => :unitTests do
    FileSystem.DeleteDirectory("deploy")
    FileSystem.EnsurePath("deploy/package/lib")
    FileSystem.CopyFiles("src/Gribble/bin/Release/Gribble.dll", "deploy/package/lib")
    FileSystem.CopyFiles("src/Gribble/bin/Release/Gribble.pdb", "deploy/package/lib")
end
Here we make sure the "deploy" folder is cleared out and a fresh folder structure is recreated each build. Then we copy the assembly and pdb from our project "release" folder to the "lib" folder.
Creating the Nuspec File
Now we need to create the Nuspec file. You can find more information on that here. This file contains a description of the Nuget package and is bundled with it. For that we will use the Albacore nuspec task:
desc "Create the nuspec"
nuspec :createSpec => :prepPackage do |nuspec|
   nuspec.id = "gribble"
   nuspec.version = ENV["GO_PIPELINE_LABEL"]
   nuspec.authors = "Mike O'Brien"
   nuspec.owners = "Mike O'Brien"
   nuspec.description = "Gribble is a simple, Linq enabled ORM designed to work with dynamically created tables."
   nuspec.summary = "Gribble is a simple, Linq enabled ORM designed to work with dynamically created tables."
   nuspec.language = "en-US"
   nuspec.licenseUrl = "https://github.com/mikeobrien/Gribble/blob/master/LICENSE"
   nuspec.projectUrl = "https://github.com/mikeobrien/Gribble"
   nuspec.working_directory = "deploy/package"
   nuspec.output_file = "gribble.nuspec"
   nuspec.tags = "orm sql"
end
You'll notice that this task depends on the prepPackage task to get our package folder initialized. You can look at the link noted earlier to get more information about these properties so I'll just cover a couple of important ones. First the id property is going to be set to the package id we reserved earlier in the gallery. The version must be set so that this package can be differentiated from others that you push. In this case I'm using the version number created by the build server. The working directory and output file determine where the spec will be created. We want it to be created in the root of the package folder. This produces the following nuspec file:
<?xml version='1.0'?> <package xmlns='http://schemas.microsoft.com/packaging/2010/07/nuspec.xsd'> <metadata> <id>gribble</id> <version>1.0.28</version> <authors>Mike O'Brien</authors> <description>Gribble is a simple, Linq enabled ORM designed to work with dynamically created tables.</description> <language>en-US</language> <licenseUrl>https://github.com/mikeobrien/Gribble/blob/master/LICENSE</licenseUrl> <projectUrl>https://github.com/mikeobrien/Gribble</projectUrl> <owners>Mike O'Brien</owners> <summary>Gribble is a simple, Linq enabled ORM designed to work with dynamically created tables.</summary> <tags>orm sql</tags> </metadata> </package>
Creating the Nuget Package
Now that we have a package folder and nuspec file we can package all this up. To do this we can use the nugetpack task (No documentation on that yet):
desc "Create the nuget package"
nugetpack :createPackage => :createSpec do |nugetpack|
   nugetpack.nuspec = "deploy/package/gribble.nuspec"
   nugetpack.base_folder = "deploy/package"
   nugetpack.output = "deploy"
end
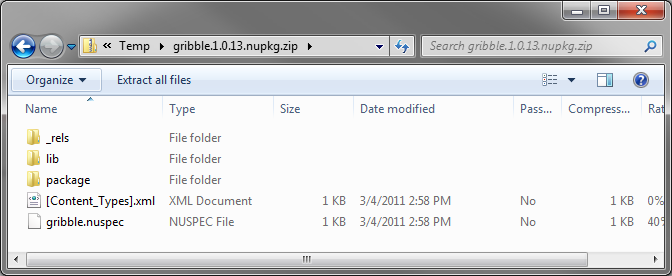
This task is pretty simple; we need to provide the path to the nuspec file (nuspec), the path to the package folder (base_folder) and the folder to put the generated package into (output). The filename for the package is [Id].[Version].nupkg (i.e. gribble.1.0.28.nupkg). The actual package is just a zip file. You can open it with your favorite zip utility and view the contents. It's basically the same as your package folder, save a few additions:

Push the Nuget Package to the Gallery
Now that we have the package we can push it to the gallery. To do this you will need to download the Nuget command line utility onto your build server. You can download it here ("NuGet.exe Command Line"). You can place it wherever you want but you will need to include the parent folder in your system path so that your build server can find it (This may require you to restart your build server service after you modify the system path). If you don't know how to modify the system path just follow the steps here. Now Albacore doesn't have a task to handle the pushing of the package so we'll create our own (nuget.rb):
require "yaml"

class NugetPush
    attr_accessor :apiKey, :package

    def run()
        @apiKey = YAML::load(File.open(ENV["USERPROFILE"] + "/.nuget/credentials"))["api_key"] unless !@apiKey.nil?
        system("nuget", "push", @package, @apiKey)
    end
end

def nugetpush(*args, &block)
    body = lambda { |*args|
        rc = NugetPush.new
        block.call(rc)
        rc.run
    }
    Rake::Task.define_task(*args, &body)
end
And here is how we would use it:
require "albacore"
require "release/filesystem"
require "release/nuget"

# ... Other tasks ...

desc "Push the nuget package"
nugetpush :pushPackage => :createPackage do |nugetpush|
   nugetpush.package = "deploy/gribble.#{ENV['GO_PIPELINE_LABEL']}.nupkg"
end
Not too much to it. All you have to do is provide the path to the package we created in the last step. But there is the matter of the api key which is needed to authenticate you. The task we created can take this directly in the build script but that is generally not a good idea as it will be visible to everyone who has access to the script (If your project is open source then that means everybody). So we take a cue from ruby gems and allow you to cache the key in the user profile (Which is evidently on its way in the next version of Nuget). You'll notice that it looks for a yaml file called "[UserProfile]\.nuget\credentials" with an item called "api_key". If your build server service is running under a user account this path will probably be something like "C:\Users\ServiceAccount\.nuget\credentials". If its running as LocalSystem it gets a bit more tricky. If your build server is running on an x64 operating system the path will be "C:\Windows\SysWOW64\config\systemprofile\.nuget\credentials" and if it is an x86 operating system it will be "C:\Windows\System32\config\systemprofile\.nuget\credentials". To create the ".nuget" folder you will have to do it from the command line as Windows Explorer doesn't like the period prefix. After you create the folder, create a file called "credentials" and enter the following:
api_key: [Your API Key]
Once that's set the script will pull the key from there.
At this point you should be ready to run your build script and have it create your nuget package and push it to the gallery. If you're interested in doing this with ThoughtWorks Go check out this post and substitute the ruby gems related steps with the steps above. The code samples above were taken from the Gribble project. You can see full build script here.


 Bender (51 )