Using Gulp to Build and Deploy .NET Apps on Windows November, 2014
I’ve been using Grunt to build and deploy .NET apps for about a year now. Its a huge improvement over Rake and the crusty XML build tools but I’d been hearing a lot of good things about gulp so I thought it was time to check it out. I was not disappointed and would highly recommend using gulp over Grunt. Gulp’s code over configuration approach eliminates the friction I experienced with Grunt. It also reduces (Or eliminates entirely) the code required to wire up tasks. So lets see how we can use gulp to build .NET apps.
- Project Layout
- Initial Setup
- Task Sequence
- Passing in parameters
- Assembly Info
- Setting Configuration Values
- Building
- Running Tests
- Controlling Windows Services
- Deploying Files
- Database Migration
- Nuget
- Build Server
Project Layout
The project layout will be along the lines of this:
/MyApp
    /src
        MyApp.sln
        ...
    /...
    gulpfile.js
    package.json
    ...
At the root of your project will be a package.json that specifies your dependencies. Also a gulpfile.js which is your build script.
Initial Setup
- Download and install Node.js.
- Create a minimal
package.jsonat the project root or usenpm initto generate it for you:
{
    "name": "MyApp",
    "version": "0.0.0"
}
- Create a bare bones
gulpfile.jsat the project root:
var gulp = require('gulp');

gulp.task('default', []);

gulp.task('ci', []);
Above we have a special default task alias that gets run when you type gulp with no arguments. You can decide what you want that to do; I have it setup to run Karma in watch mode. The second task alias, ci, will be what is run by the build server (And you can call this whatever you want so long as the build server knows about it, as we’ll see later).
- Install
gulpglobally (-g):npm install gulp -g - Install
gulplocally (No-g) and save the dependency to yourpackage.json:npm install gulp --save - Run
gulpto make sure all is working, should display something along these lines:
[14:48:30] Using gulpfile /.../gulpfile.js
[14:48:30] Starting 'default'...
[14:48:30] Finished 'default' after 32 μs
NOTE: Throughout this post I will be using the --save flag to save NPM dependencies to the package.json file. You may have also seen the --save-dev flag and might be confused as to when you should use one over the other. Check out this SO question for an explanation.
Task Sequence
Gulp will try to run every task in parallel. Obviously you will need to run certain tasks in a particular order in your build. The current version of gulp allows you to do this a few ways. First you will need to specify a dependency and then some way to indicate the dependency has completed. According to the gulp docs, you can indicate that a dependency has completed by either returning a stream, returning a promise or taking in a callback and calling it when done. The following demonstrates the stream and callback approaches:
// Return a stream so gulp can determine completion
gulp.task('clean', function() {
    return gulp
        .src('app/tmp/*.js', { read: false })
        .pipe(clean());
});

// OR

// Take in the gulp callback and call it when done
gulp.task('clean', function(callback) {
    gulp.src('app/tmp/*.js', { read: false })
        .pipe(clean());
    callback();
});

// Specify the dependencies in the second parameter
gulp.task('build', ['clean'], function() {
    // Build...
});
So if you run the build task in this example, the clean task will run and complete first, then the build task will run. I will favor returning the stream throughout this post unless the callback or promise method makes sense.
Seem awkward and/or confusing? You’re not alone. The upcoming gulp 4 release will revamp how this is handled. When that is released I will update this post to reflect those changes.
Passing in parameters
Undoubtedly you’ll want to pass parameters into your build scripts. For example passing in the version or a nuget api key. One way to do this is with environment variables:
gulp.task('default', function() {
    var version = process.env.BUILD_NUMBER;
    var nugetApiKey = process.env.NUGET_API_KEY;
    ...
});
Another way to do this is by passing them into gulp as parameters:
var args = require('yargs').argv;

gulp.task('default', function() {
    console.log(args.buildVersion);
    console.log(args.debug);
});
$ gulp --build-version 1.2.3.4 --debug
[14:48:30] Using gulpfile /.../gulpfile.js
[14:48:30] Starting 'default'...
[14:48:30] 1.2.3.4
[14:48:30] true
[14:48:30] Finished 'default' after 32 μs
Here we are using the yargs module (Which is a fork of optimist) to parse the gulp command line args (npm install yargs --save). You can pass in any arguments you like so long as they don’t conflict with gulp options (Which is why I use build-version instead of version which is already used by gulp). One nice feature of yargs is that arguments that do not have a value are considered flags and represented as booleans (As demonstrated above with --debug). Another nice feature is the automatic conversion of spinal-case-args to camelCase. I will use this approach throughout this post.
Assembly Info
First thing you will want to do is set the version number in the project assembly info files (And any other info you’d like). I personally let the build server manage the version and then grab it from an environment variable, but you can do whatever works best for you. To do this we’ll use the gulp-dotnet-assembly-info plugin (npm install gulp-dotnet-assembly-info --save). Use the plugin as follows:
var args = require('yargs').argv,
    assemblyInfo = require('gulp-dotnet-assembly-info');

gulp.task('assemblyInfo', function() {
    return gulp
        .src('**/AssemblyInfo.cs')
        .pipe(assemblyInfo({
            version: args.buildVersion,
            fileVersion: args.buildVersion,
            company: 'Planet Express',
            copyright: function(value) {
                return value + '-' + new Date().getFullYear();
            },
            ...
        }))
        .pipe(gulp.dest('.'));
});
So we pipe in all AssemblyInfo.cs files, modify them and then save them back out. You can specify a value or a function that returns the value. See here for more info.
Setting Configuration Values
You may need to set values in the app.config or web.config. To do this we’ll use the xmlpoke module (npm install xmlpoke --save). Use the module as follows:
var xmlpoke = require('xmlpoke');

gulp.task('configuration', ['assemblyInfo'], function(cb) {
    xmlpoke('**/{web,app}.config', function(xml) {
        xml.withBasePath('configuration')
           .set("appSettings/add[@key='connString']/@value",
                'Server=server;Database=database;Trusted_Connection=True;')
           .set('system.net/mailSettings/smtp/network/@host', 'smtp.mycompany.com');
    });
    cb();
});
This module sports a lot more features than shown here. See here for more info.
Building
Now for building. To do that we will use the gulp-msbuild plugin (npm install gulp-msbuild --save). Use the plugin as follows:
var msbuild = require('gulp-msbuild');

gulp.task('build', ['configuration'], function() {
    return gulp
        .src('**/*.sln')
        .pipe(msbuild({
            toolsVersion: 12.0,
            targets: ['Clean', 'Build'],
            errorOnFail: true,
            stdout: true
        }));
});
The plugin looks for msbuild in the PATH. You can also specify the version you want to target with the toolsVersion option. This plugin supports more options than shown here, see here for more info.
On a side note, you may run into the following error when building web applications on your build server:
The imported project "C:\Program Files (x86)\MSBuild\Microsoft\VisualStudio\
v11.0\WebApplications\Microsoft.WebApplication.targets" was not found.
A solution can be found here.
Running Tests
Next you will want to run your tests. If you are using NUnit, you’re in luck as there is a gulp plugin for that. We will use the gulp-nunit-runner plugin (npm install gulp-nunit-runner --save). Use the plugin as follows:
var nunit = require('gulp-nunit-runner');

gulp.task('test', ['build'], function () {
    return gulp
        .src(['**/bin/**/*Tests.dll'], { read: false })
        .pipe(nunit({
            teamcity: true
        }));
});
The plugin looks for NUnit in the PATH and by default runs the anycpu version of NUnit (The x32 version can be specified with the platform option). You can also explicitly pass the nunit runner path if you like. You’ll notice we’re passing read: false into the source; this indicates that only filenames, and not content, are to be included in the stream. Also, the teamcity option integrates the test results with TeamCity. The plugin supports many more options than shown here, see here for more info.
Controlling Windows Services
Sometimes you will need to deploy Windows services. In order to do this you will need to stop these services before the delploy and start them after. To do this we can use the windows-service-controller node module (npm install windows-service-controller --save). Use the module as follows:
var sc = require('windows-service-controller');

gulp.task('stop-services', ['nunit'], function() {
    return sc.stop('MyServer', 'MyService');
});

...

gulp.task('start-services', ['deploy'], function() {
    return sc.start('MyServer', 'MyService');
});
Here we are passing in a single service although you can pass in an array of service names if there are multiple. The module supports many more options than shown here, see here for more info.
Deploying Files
There are a couple of ways to deploy files. Out of the box, gulp’s innate ability to work with files will get you a long way:
gulp.task('deploy', ['nunit'], function() {
    return gulp
        .src('./src/MyApp.Web/**/*.{config,html,htm,js,dll,pdb,png,jpg,jpeg,gif,css}')
        .pipe(gulp.dest('D:/Websites/www.myapp.com/wwwroot'));
});
If for some reason you need more advanced file copy capabilities you can use Robocopy (née xcopy). We can use the robocopy node module to run it (npm install robocopy --save). Use the plugin as follows:
var robocopy = require('robocopy');

gulp.task('deploy', ['nunit'], function() {
    return robocopy({
        source: 'src/MyApp.Web',
        destination: 'D:/Websites/www.myapp.com/wwwroot',
        files: ['*.config', '*.html', '*.htm', '*.js', '*.dll', '*.pdb',
                '*.png', '*.jpg', '*.jpeg', '*.gif', '*.css'],
        copy: {
            mirror: true
        },
        file: {
            excludeFiles: ['packages.config'],
            excludeDirs: ['obj', 'Properties'],
        },
        retry: {
            count: 2,
            wait: 3
        }
    });
});
The robocopy function returns a promise so we can just return this to allow gulp to know when it has completed. You’ll also notice that robocopy is not a gulp plugin and this is ok. Unlike Grunt where everything is a plugin, gulp plugins are really only useful if they operate on a stream of files. Many times you will just invoke a module in a gulp task like we do above, no plugin involved at all. @ozcinc has a nice writeup on this here.
The Robocopy options above are pretty self explanatory. The mirror option allows you to synchronize your destination with your source folder, removing any deleted files. The retry options allow you to retry the copy after so many seconds if it failed. Both these options can be useful when deploying websites. The task fully supports all the robocopy options, see here for more info.
Database Migration
More than likely your app is data driven and you will need to deploy schema changes. The simplest approach is to apply a delta script. To do this we can use the sqlcmd-runner module (npm install sqlcmd-runner --save).
var sqlcmd = require('sqlcmd-runner');

gulp.task('database', ['robocopy'], function() {
    return sqlcmd({
        server: 'sql.mycompany.int',
        database: 'myapp',
        inputFiles: [ 'delta.sql' ],
        outputFile: 'delta.log',
        failOnSqlErrors: true,
        errorRedirection: true
    });
});
This module is a wrapper around the sqlcmd utility and supports all options; see here for more info.
If you’re using DB Ghost to create your delta script, you can use the dbghost module (npm install dbghost --save).
var sqlcmd = require('sqlcmd-runner');

gulp.task('database', ['robocopy'], function() {
    return dbghost.buildCompareAndCreateDelta({
        configSavePath: 'CreateDelta.dbgcm',
        changeManager: {
            reportFilename: 'CreateDelta.log',
            buildDatabaseName: 'Source',
            deltaScriptsFilename: 'delta.sql',
            templateDatabase: {
                name: targetSchema,
                server: 'sql.mycompany.int'
            },
            targetDatabase: {
                name: targetSchema,
                server: 'sql.mycompany.int'
            },
            schemaScripts: {
                rootDirectory: 'schema',
            }
        }
    })
    .then(function() {
        return sqlcmd({
            server: 'sql.mycompany.int',
            database: 'myapp',
            inputFiles: [ 'delta.sql' ],
            outputFile: 'delta.log',
            failOnSqlErrors: true,
            errorRedirection: true
        });
    });
});
This module is a wrapper around ChangeManagerCmd.exe and can either generate a config from scratch or from a template, overriding the template with the config passed in. See here for more info.
Nuget
If you are publishing a Nuget package instead of deploying an app there is a module for that too. We can use the nuget-runner module (npm install nuget-runner --save). You will need to create a nuspec file as described here. Use the module as follows:
var args = require('yargs').argv,
    Nuget = require('nuget-runner');

gulp.task('deploy', ['nunit'], function() {

    // Copy all package files into a staging folder
    gulp.src('src/MyLibrary/bin/Release/MyLibrary.*')
        .pipe(gulp.dest('package/lib'));

    var nuget = Nuget({ apiKey: args.nugetApiKey });

    return nuget
        .pack({
            spec: 'MyLibrary.nuspec',
            basePath: 'package', // Specify the staging folder as the base path
            version: args.buildVersion
        })
        .then(function() { return nuget.push('*.nupkg'); });
});
As demonstrated above you can set the version number and your nuget API key from an environment variable set by the build server. One thing to note is that even though you are passing in the version, the version element must exist in the nuspec file and have a value, otherwise pack will fail. The pack method returns a promise so we can just return this to allow gulp to know when it has completed.
You can also simplify the above code a bit more by specifying the the files in the .nuspec:
<package ...>
   <metadata>
      ...
   </metadata>
   <files>
      <file src="src\MyLibrary\bin\Release\MyLibrary.*" target="lib" />
   </files>
</package>
Then you can forgo creating the staging folder and specifying a basepath:
var Nuget = require('nuget-runner');

gulp.task('deploy', ['nunit'], function() {

    var nuget = Nuget({ apiKey: process.env.NUGET_API_KEY });

    return nuget
        .pack({
            spec: 'MyLibrary.nuspec',
            version: process.env.BUILD_NUMBER
        })
        .then(function() { return nuget.push('*.nupkg'); });
});
The module supports more commands and options than shown here, see here for more info.
Build Server
The last step is to setup your build server to run gulp. I’m going to demonstrate how to configure gulp with TeamCity but this should loosely apply to any build server.
- Download and install Node.js.
- Install
gulp:npm install gulp -g -prefix="C:\Program Files\nodejs". You will need to set the prefix to a folder in thePATH. I simply put it in the node install directory along side NPM. By default this folder is added to thePATHby the Node.js installer. Note that depending on your UAC settings you may need to run that command in an elevated command prompt asProgram Filescan be locked down. Also the 32 bit version will be installed toProgram Files (x86)by default. - Restart the TeamCity build agent so it picks up the Node.js path.
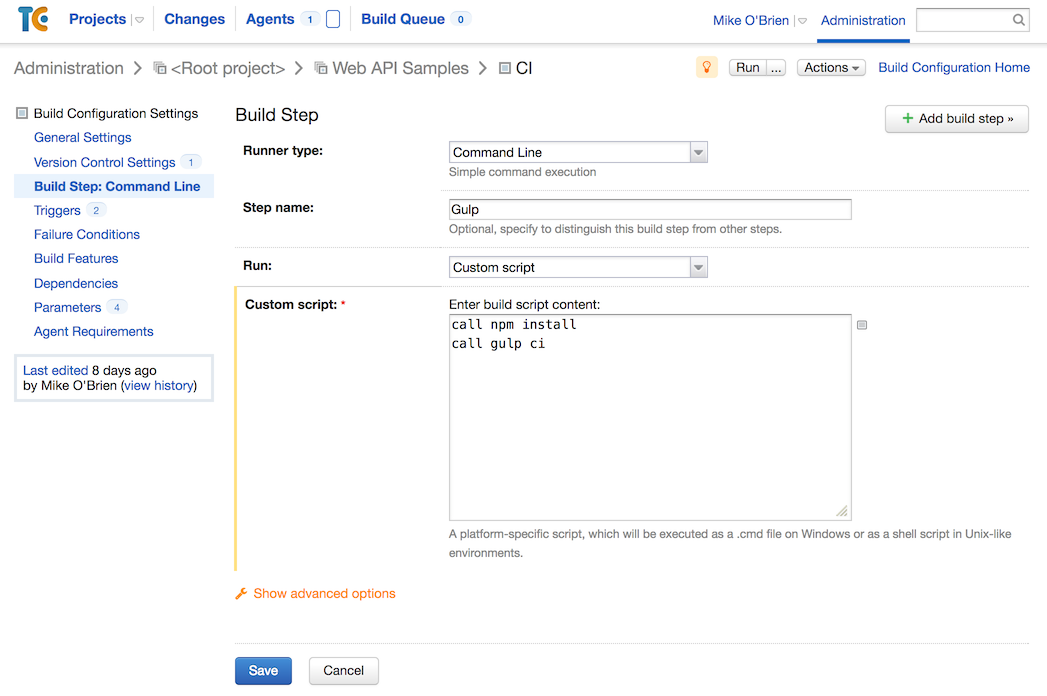
- Create a
Command Linebuild step in TeamCity, setRuntoCustom scriptand enter the following as theCustom script:
call npm install
call gulp ci
Here we call gulp with the task we want to run.
As mentioned above you may want to pass parameters into your build script. There are a couple of ways to do this. First you can hard code them directly into the custom script above:
call npm install
call gulp ci --build-version 1.0.0.0 --nuget-api-key 78a53314-c2c0-45c6-9d92-795b2096ae6c
There are a couple of problems with this however. First, you don’t want to manually manage your version number when TeamCity already does that for you automatically. So you can take advantage of TeamCity predefined build parameters and dynamically pass the version number as follows:
call npm install
call gulp ci --build-version %build.number%
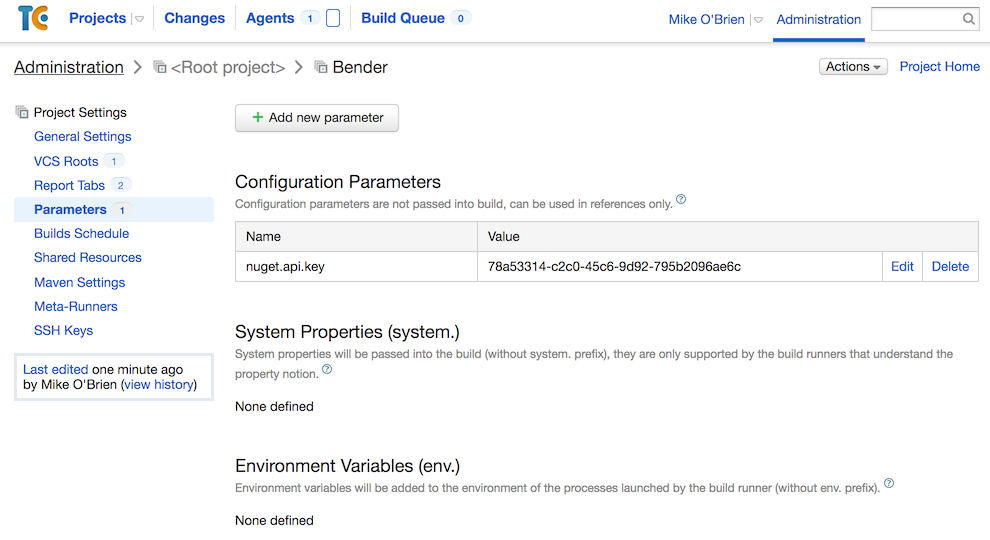
Now the Nuget API key could be hardcoded for some builds but what if you use the same API key for multiple builds? Again you can make use of build parameters as TeamCity allows you to create custom parameters at different levels. This allows you set the parameter in one place where it can be referenced by multilple builds. You would specify the custom parameter as you would the predefined one:
call npm install
call gulp ci --nuget-api-key %nuget.api.key%
Here you can see the custom build parameter set at the project level. All build configurations under it inherit this parameter.
Usually you will want to keep an eye on how long tasks take to execute. TeamCity allows you to customize notifications so you can include task timings in your notifications. To do this we’ll need to edit the build_successful.ftl template of your preferred notification type and add the following template. You can add it anywhere you want.
<b>Gulp Task Timings</b>
<br/>

<table border="0">
<#list build.buildLog.messages[1..] as message>
    <#assign tasks = message.toString()?matches(r".*\sFinished\s\'(.*)\'\safter\s(.*)")>
    <#if tasks && !tasks?groups[2]?contains("μ") ><tr>
        <td>${tasks?groups[1]}</td>
        <td>${tasks?groups[2]}</td>
    </tr></#if>
</#list>
</table>
Your notifications will then display task timings along the lines of this:
Gulp Task Timings

init           6.51 ms
assembly-info  1.9 s
config         119 ms
style-cop      71 ms
build          2.88 s
unit-tests     4.11 s
...
Tasks are displayed in the order they finish.
Final Thoughts
Hopefully this demonstrates how easy it is to setup a .NET build/deploy on Windows with gulp. If you are also doing client side development, this will be even more of a win as your tools (Like Karma, JSHint, etc) will be run by the same build tool.
 Bender (51 )