Using Git Locally on Windows with a Central SVN Repository July, 2010
There is a lot of into out there on this subject so the following post is mainly just a brain dump that I can refer back too. Plus I'm pretty green with git so I cannot guarantee that I actually know what I'm talking about. Maybe you will find it useful, but I'm not promising anything. :)
We have a central SVN repository and I want to use Git locally but push/fetch to/from the central svn repo. Sam Vilain has a nice tutorial discussing how to integrate Git with svn (If its not available try here) as does GitHub. Also check out Jason Meridth's blog series, Git for Windows Developers; very nice tutorial on Git in general, and where I got a lot of my info from.
Install msysgit
You will need to install msysgit. Here are some notes:
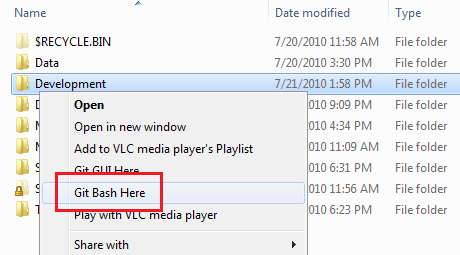
- I've found the "Get Bash Here" explorer context menu to be handy; this can be installed by selecting the option in the "Select Components" installer dialog, under "Windows Explorer Integration".
- I suggest selecting the "Run Git from the Windows Command Prompt" option in the "Adjusting your PATH environment" installer dialog. This will allow you to run Git from the command line. I personally use the bash shell but I figure it wouldn't hurt to have Git available on the command line as well if needed.
- I've chosen not to have Git adjust the line endings as we are not doing cross platform development.
Configure Git
You can access the bash shell anywhere by right clicking a folder in explorer and clicking "Git Bash Here". Right click the parent folder that you want to contain the source folder (Created by the clone command in the next section).
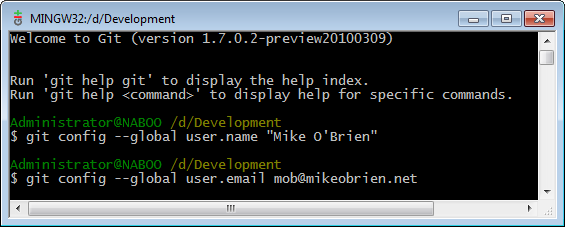
Once you open your bash shell you will need to set your name and email. This can be configured at 2 levels, global and local. The global values work as the default whereas the local values are specific to a repository. It's a good idea to set a global name and email, and where you need to, set a local one. The following demonstrates setting the global values:
The syntax for setting the local name and email is the same as the global except you leave out the –-global flag. Make sure you are in the project folder when you set the local name and email:

All the following will be performed in the bash shell.
Clone the SVN Repo
In Sam's tutorial he discusses a few ways to init your local Git repo. In my case I wanted a full copy of our svn repo with history. To do this you can clone the SVN repository with the git svn clone command. The clone command does a git svn init and then a git svn fetch, all in one command. If you are trying to clone directly from the repository files, you will (as of the date of this post) run into the error "Permission denied: Can't open '/tmp/report.tmp': Permission denied at C:\Program Files\Git/libexec/git-core/git-svn line 2685". I worked around this by installing svnsrv locally and accessing the repository via svnserve (instead of directly on the file system). You can perform the clone as follows:
git svn clone –T trunk svn://<HostName>/<RepoName>
In this example I only want to track the trunk so only that folder is specified with the –T flag. You can also track branches and tags if you'd like by adding the corresponding flags. But if you just want the root of the svn repo (If you not using the "standard" folder layout) you can just leave out the trunk/branches/tags options:
git svn clone svn://<HostName>/<RepoName>
This operation can take a while depending on the size of your repo (Into the hours or even days). I just opted to zip and download the entire svn repo from our server and do the clone locally instead of over the web. Not 100% sure if this saved time or if it was 6 of one, half dozen of the other. I know for sure it couldn't have been slower so it seemed like a smarter option. Even then, the 325 mb repo took around 8 hours to clone. But from here on out, new Git developers could get a clone from someone who already has one instead creating a new one on their own.
If you cloned the repo from an alternate source (For example a local copy, like I mentioned doing above) you will need to point the git repo to the correct upstream svn repo. Following the next few steps will do this (More about this here where I found the procedure). If you cloned directly from the upstream svn repo then you can skip these next steps.
- Edit the svn-remote url in \.git\config to point to the new url (Remember the url is just the url to the repository, do not include "trunk" or a subfolder):
...
[svn-remote "svn"]
url = https://svn.someserver.com/projecteulernet
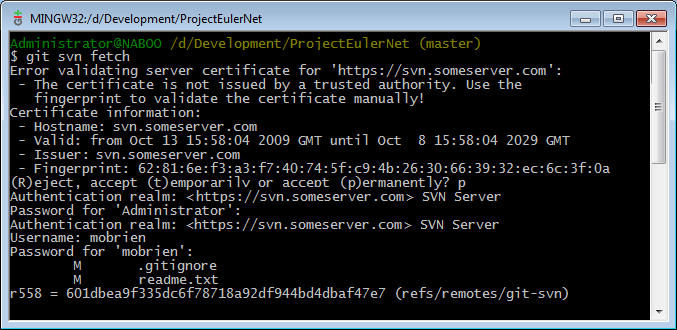
fetch = :refs/remotes/git-svn - Run git svn fetch (This needs to fetch at least one new revision from svn). The following example demonstrates connecting to an upstream svn server running over https with a self signed cert and basic authentication. As with svn, you can permanently accept the self signed cert when prompted. When prompted for the password (of the default username) you can just hit enter to be prompted for the username.
- Now go back again and edit the svn-remote url in \.git\config to point to the old url.
- Run git svn rebase -l to do a local rebase (with the changes that came in with the last fetch operation):

- One final time, go back and edit the svn-remote url in \.git\config to point to the new url.
- Run git svn rebase and you should be good to go:

Ignored files
Git ignores files that are specified in a file called ".gitignore". You can place this file at the project root to specify globally ignored file patterns. To create this file, change to the project directory, and use the touch command (Windows doesn't like to create it because it starts with a period):

You will need to add the patterns you want ignored, on separate lines, to the file you just created. For example:
obj
bin
_ReSharper.*
*.user
*.suo
This only needs to be done once. The file will be committed to the repository and be automatically applied to everyone else once they fetch it.
Committing Changes
After the clone, change to the project folder and run git status:

Next make a change and run git status again (In this case I removed a file and updated the ignored file filters):

git status now shows some modifications. We want to commit these files to the local repo but first we will need to add these files to the index. The index is a staging area for files we want to commit. When we commit, we commit from the staging area, not the working folder. That's why we add files to the index first. That being said, if you make change to a file that has already been added to the index, this new change will not be picked up by a commit, only the previous change(s). If you want the new change to be committed you would need to add the file to the index again. The git add command adds files to the index. This command is followed by a pattern to filter the files being added. You can get fancy with this filter but for the simplicities sake we'll just use the period which means all changed files. This command does not echo a response.

Now lets check the status:
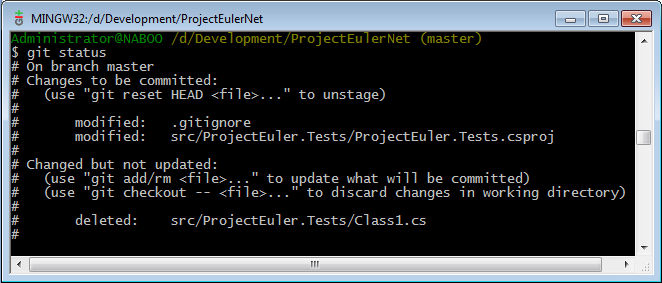
We can see the two modified files have been added to the index, ready to be committed. You'll notice though that there is a file in there that has been deleted by Visual Studio but is not marked in the index to be deleted. You can mark already deleted files in the index by using the –A flag instead of the dot (See the bottom of this page for more info). The -A flag adds all files in the working folder, already added to the index or not, that have been modified, added or deleted.

Now check the status:
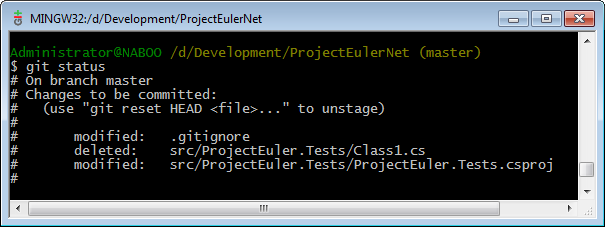
At this point we have all the changes we want committed added to the index. Now lets commit these changes:

Checking the status again we see there are no changes to commit:

What is Rebasing and Why Should I Care?
Before we move on we need to discuss rebasing. Git allows you to merge branches and have a non linear history using the git merge command. But because of the functionality mismatch between svn and Git in regards to how history is recorded, we need to have linear history in the branch that is tied to an upstream svn repo. Github's tutorial on using Git with svn notes "Do not dcommit Git merge commits to the Subversion repository. Subversion doesn't handle merges in the same way as Git, and this will cause problems. This means you should keep your Git development history linear (i.e., no merging from other branches, just rebasing)". Also the Git-svn man page states "Running git merge or git pull is NOT recommended on a branch you plan to dcommit from. Subversion does not represent merges in any reasonable or useful fashion; so users using Subversion cannot see any merges you've made". As an aside, dcommit is the command used to push changes to the upstream svn repo, we discuss this later. So to create a linear history in a branch, and play nice with svn, you will need to rebase instead of merge when moving changes into that branch from another branch. The git rebase command is described in more detail here, here and here. How does a rebase differ from a merge? Nick Quaranto's intro to rebase covers it very nicely; I'd suggest jumping over to his site and reading the entire post. Below I shamelessly rip off a few of the images from his post that helped me to better understand visually:
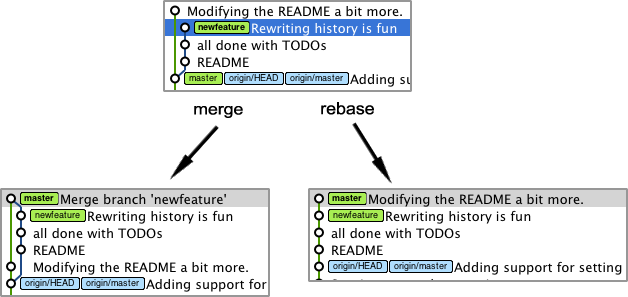
So in the example above, we have the "master" branch and a branch called "newfeature" (Top). If we merge the "newfeature" branch into the "master" branch it preserves the branch history (Which is non-linear) and does one big commit back into master. Rebase on the other hand temporally (As in time; not "temporarily") replays the commits from the other branch onto master and eliminates the other branch altogether (Creating one linear history with multiple commits). Svn doesn't like the former but plays nice with the latter.
So there are 2 scenarios when integrating with svn where you will need to use rebase. First, if you have a local branch and you want to move changes from that branch into another local branch that is tied to an upstream svn repo. And second, when you grab changes from the upstream svn repo and move them into the branch that is tied to it. The latter is discussed next.
Apart from those two scenarios it's up to you whether you want to merge or rebase other branches.
Grabbing Changes from the SVN Repo
Before we move our changes to the remote SVN repo we will need to grab updates from it, so we'll cover this topic now. To do this we will use the git svn rebase command. The git svn rebase command calls git svn fetch and then git rebase (Discussed in the last section). The git-svn man page says this regarding git svn rebase: "This works similarly to svn update or git pull except that it preserves linear history with git rebase instead of git merge for ease of dcommitting with git svn". It also notes "... It is recommended that you run git svn fetch and rebase (not pull or merge) your commits against the latest changes in the SVN repository... you should use git svn rebase to update your work branch instead of git pull or git merge. pull/merge can cause non-linear history to be flattened when committing into SVN, which can lead to merge commits reversing previous commits in SVN."
Ok, lets perform the rebase:

Nothing too exciting; no updates in the upstream repo. Now lets cause a conflict and call rebase again:
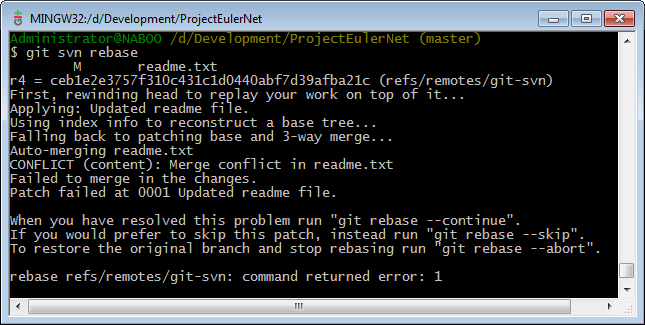
Now this is a bit more exciting. We can resolve this conflict manually (By editing the file in question) or better yet we can resolve the conflict using a 3 way merge tool. The gitguru has a nice article on integrating visual merge tools with Git (Including setting up your own custom merge tool). Here are a few tools you have to choose from: kdiff3, tkdiff, meld, xxdiff, emerge, vimdiff, gvimdiff, ecmerge, diffuse, tortoisemerge, opendiff, p4merge, araxis. The default is vimdiff (If you have nothing else installed). The following will demonstrate how to setup the free Perforce merge tool.
- Download and run the Perforce Visual Client (P4V).
- On the "Select Features" installer dialog, deselect all features except the "Visual Merge Tool (P4Merge)".
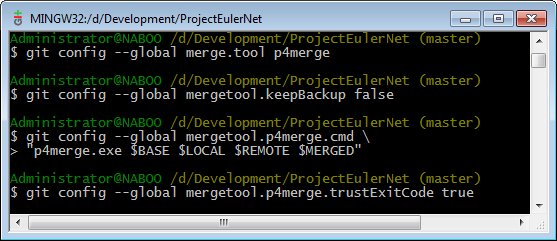
- Configure the Perforce merge tool in Git (Note: if your using an older version of git you will need to escape the dollar signs with a backslash, IE: "p4merge \$BASE \$LOCAL \$REMOTE \$MERGED"):
- Restart your bash shell so that it can pick up the new PATH variable (Which the Perforce installer adds itself to).
Once you have a merge tool setup you can start the merge process with the git mergetool command:

After you hit enter the Perforce merge tool will pop up and you can handle the merge. When your done, save it and exit. If there are multiple files you will be prompted to merge the other files. When you are done you can continue the rebase with the continue flag:

Doing another git status should show that everything is up to date.

UPDATE: Thanks to @dahlbyk for pointing out that you can configure Git to delete the .orig file by setting the global mergetool.keepBackup setting to false. The screen shot above has been updated to include this. As an aside Git doesn't automatically delete the original file that was apart of a merge. Not sure why it leaves it behind. In the example above there is a file called readme.txt.orig still laying around. I added a filter to ignore files with the .orig extension (Earlier in this post) so they will not come up as unversioned. Anyways, just be aware that there will be droppings laying around after a merge.
Pushing Changes to the Central SVN Repo
Now that we've made our changes, added them to the index, committed them locally and rebased, we can push those changes to the central SVN repo. Just to clarify, you can do multiple commits locally before you push your changes, so you don't have to push right after every commit if you don't want to (That's the beauty of a DVCS). To do this simply run the git svn dcommit command:
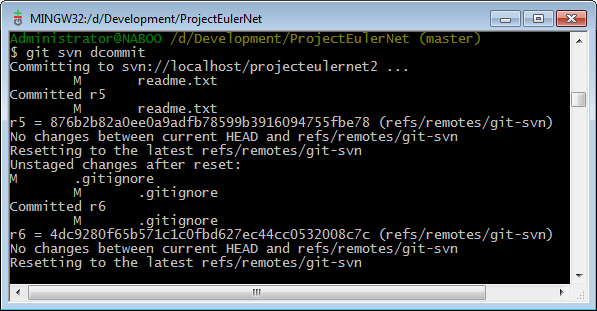
We can see that the commits that we made have been pushed to the upstream repo as separate svn revisions.
Conclusion
You can easily get the benefits of Git even if you have to work with an svn repo. Yay!

 Bender (51 )