Step by Step Installation Of Subversion Over Apache/SSL Authenticating through Active Directory (SSPI) December, 2007
The following is a step by step installation of Subversion over Apache and SSL authenticating through an Active Directory server or local server accounts. BTW, I'm by no means an Apache guru so please leave a comment if I'm missing anything. And thanks to a bunch of people who I cant remember who posted info on the web that helped in compiling these steps! :)
- Install the latest CollabNet Win32 distribution found here.
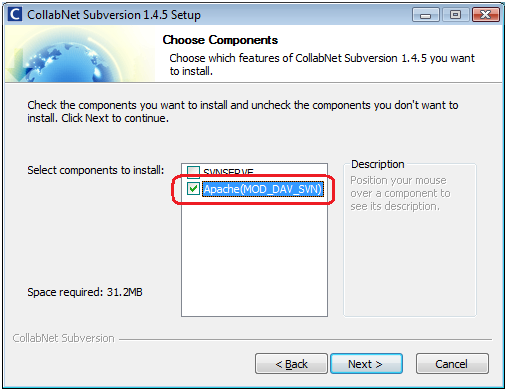
- Make sure that only the Apache (MOD_DAV_SVN) component is checked.
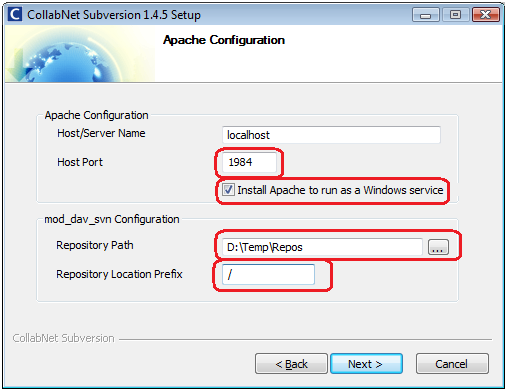
- Set the Apache configuration. You can set an arbitrary http port for now; it will change when SSL is setup. Also remember to check the "Install Apache ... as a Windows Service" checkbox. The other two options should be set accordingly.
- Make sure that only the Apache (MOD_DAV_SVN) component is checked.
- Create a test repository
- Open a command prompt and run the following command from the CollabNet installation folder (C:\Program Files\CollabNet Subversion Server\) to create a test repository:
svnadmin create d:\temp\Repos\mysweetapp
- Open a command prompt and run the following command from the CollabNet installation folder (C:\Program Files\CollabNet Subversion Server\) to create a test repository:
- Test Connectivity
- Start the Apache service; it should be called Apache2.
- Browse to the test repository at http://localhost:1984/mysweetapp with a Subversion client and create a folder to verify that everything is setup correctly.
- Install and Configure the SSPI module
- Download the SSPI module from here. You will want to match the major and minor Apache build with the version number trailing the SSPI module version number. For example mod_auth_sspi-1.0.4-2.0.58.zip would be for Apache 2.0.x and mod_auth_sspi-1.0.4-2.2.2.zip would be for Apache 2.2.x (Thanks to Dan Switzer for pointing this out, I totally missed that!). After unzipping the contents if the zip, copy the mod_auth_sspi.so (In the bin folder) into the Apache modules folder (C:\Program Files\CollabNet Subversion Server\httpd\modules).
- Open the httpd.conf file in the Apache configuration folder (C:\Program Files\CollabNet Subversion Server\httpd\conf)
- Add the following line to (Or uncomment it in) the Apache configuration file (httpd.conf) in the LoadModule section:
LoadModule sspi_auth_module modules/mod_auth_sspi.so - Add the following settings, under "# Active Directory Auth", to the location section. Be sure to specify the SSPIDomain which can be an AD domain or the local server name. If it is the local server name the local user accounts will be used to authenticate. You can use this option if there is no AD server.
DAV svn
SVNParentPath D:/Temp/Repos
# Active Directory Auth
AuthName "SVN Server"
AuthType SSPI
SSPIAuth On
SSPIAuthoritative On
SSPIDomain localhost
SSPIOfferBasic on
Require valid-user
- Restart the Apache2 service after the httpd.conf file has been saved.
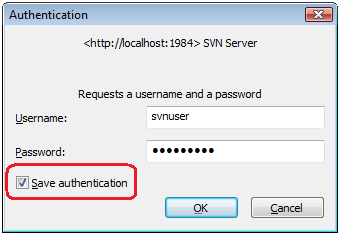
- Perform the test noted in step #3 to test connectivity, this time logging in with a user from the domain specified above.
- Note that in TortoiseSVN you can check the "Save Authentication" checkbox to avoid having to repeatedly enter your credentials:
- Configure SSL
- Create the Certificate
- Create an OpenSSL configuration file under the Apache bin folder (C:\Program Files\CollabNet Subversion Server\httpd\bin) called openssl.conf and set its contents as follows:
[ v3_ca ]
subjectKeyIdentifier = hash
authorityKeyIdentifier = keyid:always,issuer:always
basicConstraints = CA:true
[ req ]
default_bits = 1024
default_keyfile = svnserver.key
distinguished_name = req_distinguished_name
attributes = req_attributes
x509_extensions = v3_ca
string_mask = nombstr
[ req_distinguished_name ]
commonName = Common Name
commonName_default = My Server Name
[ req_attributes ] - Open up a command prompt in the Apache bin folder (C:\Program Files\CollabNet Subversion Server\httpd\bin).
- Run the following command to generate the private key and certificate request files. Be sure to enter the ip address or DNS name of the server when prompted for the common name. Also remember the pass phrase you entered as it will be required for the following step. This will create a svnserver.csr and svnserver.key file in the Apache bin folder.
openssl req -config openssl.conf -new -out svnserver.csr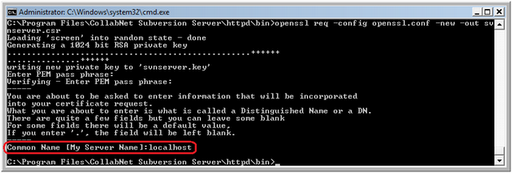
- Remove the passphrase from the private key with the following command. Enter the passphrase you specified in the last step.
openssl rsa -in svnserver.key -out svnserver.key
- Create the self signed certificate with the following command. The following command sets the certificate expiration to 20 years.
openssl x509 -in svnserver.csr -out svnserver.cert -req -signkey svnserver.key -days 7300
- Delete the svnserver.csr in the Apache bin folder.
- Copy the svnserver.key and svnserver.cert from the Apache bin folder to the Apache conf folder.
- Create an OpenSSL configuration file under the Apache bin folder (C:\Program Files\CollabNet Subversion Server\httpd\bin) called openssl.conf and set its contents as follows:
- Open the httpd.conf file in the Apache configuration folder (C:\Program Files\CollabNet Subversion Server\httpd\conf).
- Change the listen port to 443:
Listen 443 - Change the server name to include the SSL port, 443:
ServerName localhost:443 - Uncomment or add the load module directive for mod_ssl:
LoadModule ssl_module modules/mod_ssl.so - Create or overwrite the following IfModule section so that it appears as follows:
SSLEngine on
SSLRandomSeed startup builtin
SSLRandomSeed connect builtin
SSLPassPhraseDialog builtin
SSLSessionCache dbm:logs/ssl_scache
SSLSessionCacheTimeout 300
SSLMutex default
SSLCertificateFile conf\svnserver.cert
SSLCertificateKeyFile conf\svnserver.key
- Restart the Apache2 service.
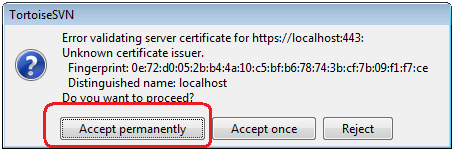
- Browse to https://localhost/mysweetapp and create a folder to test the configuration.
- Note that in TortoiseSVN you can permanently accept the certificate when this dialog appears. It is warning you that the issuer is not a trusted root authority.
- Create the Certificate


 Bender (51 )