SharePoint & Web Parts & User Controls, Oh My! July, 2007
I must say, the OOB development experience in SharePoint has been less than desirable. I feel like MS has given us a number of tools but left us in the lurch figuring out how to use them, and its not always obvious how. One thing I have wanted to do is use the designer to develop web parts and deploy them with the click of a button. The VSeWSS have made the "deploy with the click of the button" part possible but the designer part has not been so obvious. How can you marry a designer experience with the VSeWSS ease of solution deployment? I'll show you how...
For Starters
The following information utilizes the Visual Studio Extensions for WSS (VSeWSS) which can be downloaded here. VSeWSS only offers a subset of the features available with solution deployment but offers "one touch" deployment OOB. Creating your own solutions manually will give you more options but may be more work than its worth (Unless you have found some nifty 3rd party tool or created your own). So the following information will strictly use what VSeWSS has to offer. VSeWSS can only run on a Windows Server 2003 box with MOSS 2007 & Visual Studio 2005 installed (Although it can be hacked to run on XP, most of the features do not work). VSeWSS may have problems if MOSS 2007 was not installed as a standalone server, so says the download notes and my experience with it. Although I have a colleague who has used it in a farm configuration and not had an issue.
Creating a blank VSeWSS Project & Web Part
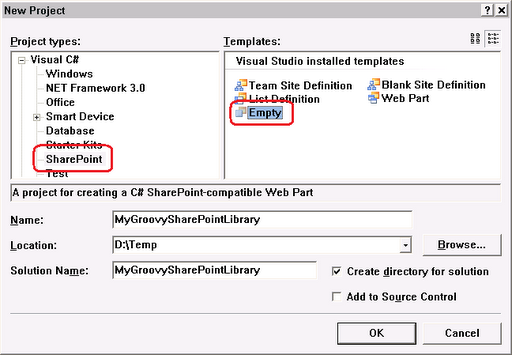
Obviously you cant use the designer with a web part but you can with a Web User Control (This is the thought behind SmartParts). So lets start off by creating a project from an empty VSeWSS template.
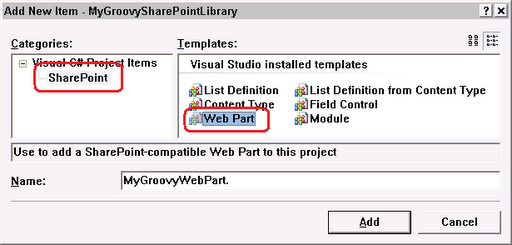
Next add a new Web Part from the VSeWSS templates.
Now your probably thinking "Now add a Web User Control, yada yada yada", right? Wrong! If you have gone down this path before you will probably discover a couple of things; first the Web User Control is not available as a new item in a VSeWSS project. This can be worked around fairly easily by modifying the templates available to the class library project type or by creating the user control in a Web Application Project (WAP) and copy the files over, either way hacky. Second, you will discover that the designer does not behave as it does in a WAP or web site. For example your code behind and designer classes are not linked together and when you double click a control the default event code is generated in the ascx file instead of the code behind. This and a number of other quirks render this method almost as bad as just coding your entire control in the Web Part (Almost, but not quite). So how do we get the designer to work properly? .
Creating a hybrid VSeWSS/WAP Project
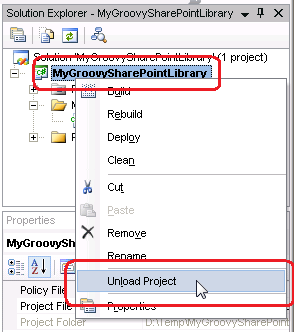
We need to create a hybrid VSeWSS/WAP project. This requires that you either have VS2005 SP1 installed or the WAP extensions installed (If you decided not to wait 5 hours for SP1 to install...). In order to make your VSeWSS project also a WAP project you will need to adjust the project type in the .xxproj file. To do this, right click the project we just created an select "Unload Project". It may ask you to save, press yes.
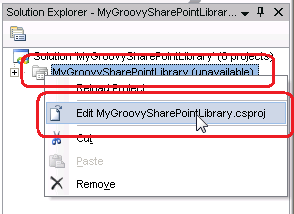
Once the project is unloaded, right click it again and select "Edit xxxxxxxxxxx.xxproj".
Once you have opened the project file you will need to add in the WAP guid into the ProjectTypeGuids element under the first PropertyGroup. This guid, {349c5851-65df-11da-9384-00065b846f21}, should be the second guid in the list (Shown in bold/green below), the first one being the VSeWSS project guid. All the guids in this element should be separated by a semicolon as shown below.
<Project DefaultTargets="Build" xmlns="http://schemas.microsoft.com/developer/msbuild/2003">
<PropertyGroup>
<ProductVersion>8.0.50727ProductVersion>
<SchemaVersion>2.0SchemaVersion>
<ProjectGuid>{7A3CF036-DC02-4868-8CBA-A88E75552372}ProjectGuid>
<ProjectTypeGuids>{9E5D3E2D-E4E2-418e-8D80-2F0DA9A94F9A};{349c5851-65df-11da-9384-00065b846f21};{FAE04EC0-301F-11D3-BF4B-00C04F79EFBC}ProjectTypeGuids>
<Configuration Condition=" '$(Configuration)' == '' ">DebugConfiguration>
<Platform Condition=" '$(Platform)' == '' ">AnyCPUPlatform>
<OutputType>LibraryOutputType>
<RootNamespace>MyGroovySharePointLibraryRootNamespace>
<AssemblyName>MyGroovySharePointLibraryAssemblyName>
<SignAssembly>trueSignAssembly>
<AssemblyOriginatorKeyFile>Properties\Temporary.snkAssemblyOriginatorKeyFile>
PropertyGroup>
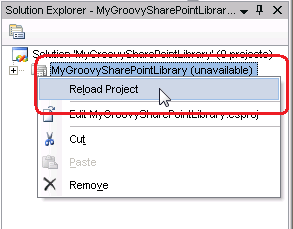
After this has been set, right click the the project again and select "Reload Project". Click yes to save when prompted.
Now close out of Visual Studio, save your project when prompted. Restart Visual Studio and open your project.
VSeWSS Deployment
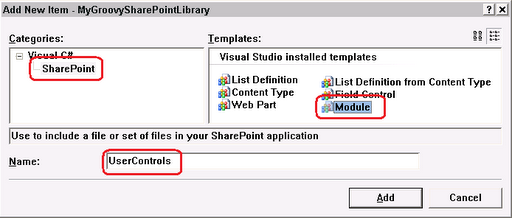
Now your probably thinking "Now add a Web User Control, yada yada yada", right? Well, yes, you can now add a Web User Control and its designer will work properly. But we want to be able to deploy it strictly with VSeWSS and its solution builder. In order to do this we will need to install the user control with a Module, so lets do that first. Right click your project and add a new Module. I will generically call it UserControls as I will want to add more user controls to it as I add web parts.
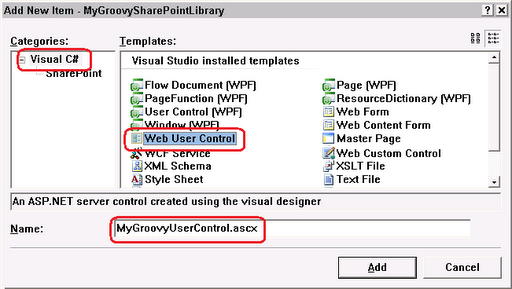
Once your module is created you can delete the "sample.txt" file from the UserControls folder. Now right click the UserControls folder and click Add --> New Item and select the standard Web User Control.
Next open the module.xml in the UserControls folder and add a reference to your newly created user control.
<Elements xmlns="http://schemas.microsoft.com/sharepoint/">
<Module Name="UserControls" Url="UserControls" Path="">
<File Url="MyGroovyUserControl.ascx" />
Module>
Elements>
The Url attribute in the Module element specifies the relative path on the SharePoint site where the file will be deployed to. In this case I chose a sub folder called "UserControls".
Creating the User Control and Linking the Web Part
Now, add a label to your User Control called CurrentTime (Or whatever you want to call it...). And set it, in the control load event, to the current time.
namespace MyGroovySharePointLibrary.UserControls
{
public partial class MyGroovyUserControl : System.Web.UI.UserControl
{
protected void Page_Load(object sender, EventArgs e)
{
CurrentTime.Text = DateTime.Now.ToString();
}
}
}
Since the VSeWSS Solution Builder creates a solution that installs only the project assembly to the GAC (Which is lame indeed) you will need to add an assembly directive to the user control, before the control directive is defined. If you do not add it before the control directive your control will fail to load as it will not have a reference to the project assembly in the GAC.
<%
@ Assembly Name="MyGroovySharePointLibrary, Version=1.0.0.0, Culture=neutral, PublicKeyToken=9f4da00116c38ec5" %><%
@ Control Language="C#" AutoEventWireup="true" CodeBehind="MyGroovyUserControl.ascx.cs" Inherits="MyGroovySharePointLibrary.UserControls.MyGroovyUserControl" %><
asp:Label ID="CurrentTime" runat="server" Text="Label">asp:Label>To obtain the public key token you can run the sn.exe utility in the SDK with the -T parameter and the path to the assembly. For example:
Next, override the CreateChildControls method of your web part and load the user control with the Page.LoadControl method. UPDATE: Thanks to Charles for pointing out that you also need to remove (If your not using it) the default Render(...) override. The WebPart template has this defined and by default it does not call the base implementation so ya get nothing displayed!
namespace MyGroovyWebPart
{
[Guid("cc2a1b52-324a-4a20-bca8-0d512f8348b4")]
public class MyGroovyWebPart :
System.Web.UI.WebControls.WebParts.WebPart
{
public MyGroovyWebPart()
{
this.ExportMode = WebPartExportMode.All;
}
protected override void CreateChildControls()
{
string userControl = "/UserControls/MyGroovyUserControl.ascx";
try
{
Controls.Add(this.Page.LoadControl(userControl));
}
catch (Exception exception)
{
string message = string.Format("{0} failed to load: {1}",
userControl,
exception.Message);
Controls.Add(new LiteralControl(message));
}
}
}
}
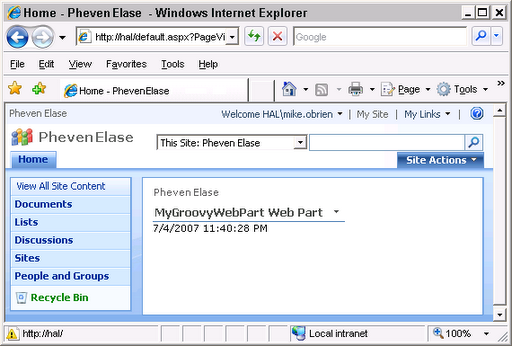
Now hit F5 and deploy!
As you can see, this method gives you the benefit of the designer and VSeWSS solution deployment. The full source of the sample can be downloaded here:
MyGroovySharePointLibrary.zip (417.78 KB)

 Bender (51 )