Setting Up TeamCity Status Badges With Shields.io December, 2014
If you’re running TeamCity and you want to enable status badges, this post is for you. Turns out this is really easy to do and you can use the badges that ship with TeamCity or use the pretty Shields.io badges.
TeamCity Badges
TeamCity has shipped with status badges out of the box for a while now: 

 . To enable these you need to do one of two things depending of whether or not you want to enable guest access (Otherwise you’ll get this:
  ).
).
No Guest Access
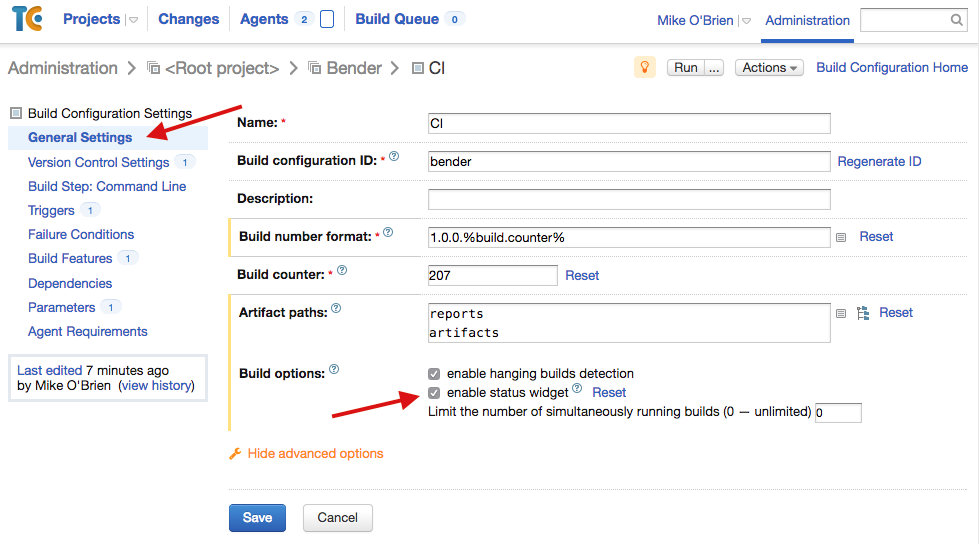
If you do not want to enable guest access you will have to individually enable status badges for each build configuration. Under the build configuration General Settings section you will see an option called enable status widget. Check this, save and the badge will now be available.
Guest Access
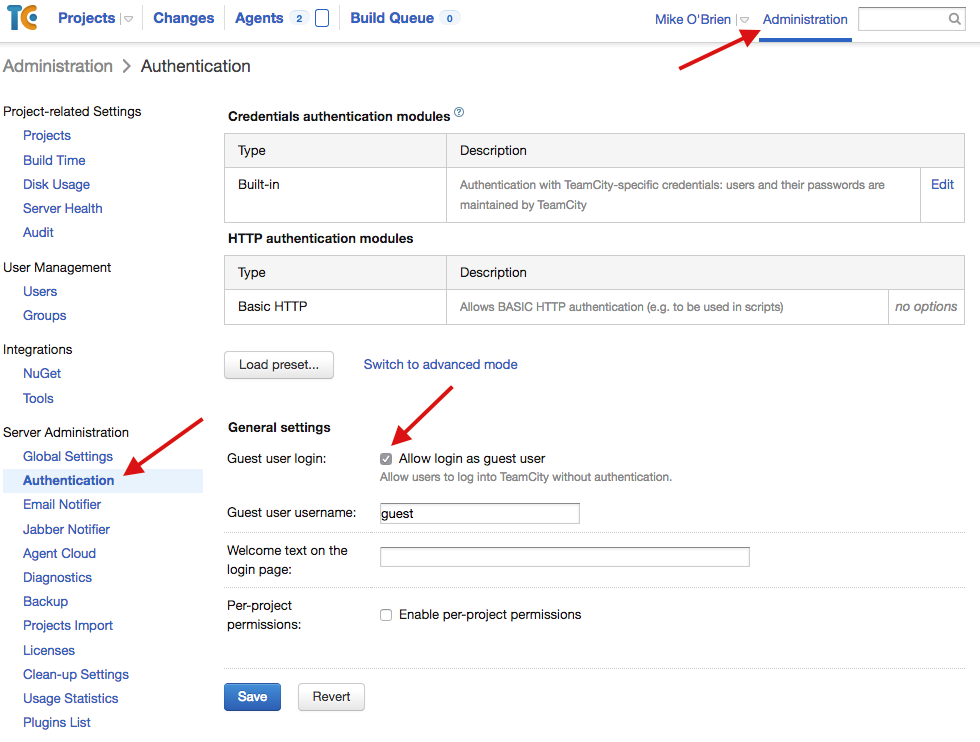
| Enabling guest access is the easiest option as it enables the status icons for all build configurations. It also allows you to create a link to the build page that anyone can view. To do this go to the global Administration page, then go to the *Server Administration | Authentication* section. There will be a checkbox that allows you to enable guest access. Check this, save and badges will now be available on all build configurations. |
Badge Url
Now that badges are enabled you can create the badge url. The url is formatted as follows:
http://Server/app/rest/builds/buildType:(id:BuildConfigId)/statusIcon
So for example if our server is build.myorg.com and the build config id was myapp the url would be as follows:
http://build.myorg.com/app/rest/builds/buildType:(id:myapp)/statusIcon
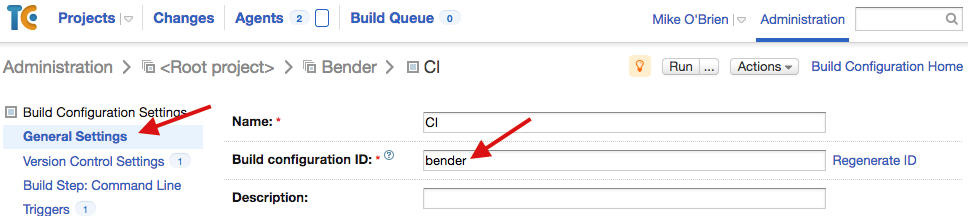
The build config id can be found under the build configuration settings. TeamCity will generate a default one that is nondescript (i.e. bt24) so you can set a more descriptive one here if you like.
Badge Link
If you enabled guest access you can also create a link to the build status page that is formatted as follows:
http://Server/viewType.html?buildTypeId=BuildConfigId&guest=1
The guest flag automatically logs them in as the guest user. So for example if our server is build.myorg.com and the build config id was myapp the html would be as follows:
<a href="http://build.myorg.com/viewType.html?buildTypeId=myapp&guest=1">
<img src="http://build.myorg.com/app/rest/builds/buildType:(id:myapp)/statusIcon"/>
</a>
Shields.io TeamCity Badges
I love TeamCity but I don’t find their status badges very attractive. Shields.io offers beautiful badges that, fortunately for us, integrate nicely with TeamCity: 
 . In order to use the shields.io badges you will need to enable badges as described in the previous section. Also your server will need to be publicly accessible. The url is formatted as follows:
https://img.shields.io/teamcity/Protocol/Server:Port/s/BuildConfigId.svg
The protocol can be either http or https and the port is optional if it is 80. Also you can choose between .svg and .png formats. So for example if our server is build.myorg.com and the build config id was myapp the url would be as follows:
https://img.shields.io/teamcity/http/build.myorg.com/s/myapp.svg
You can also specify a flat style (Which I personally prefer): 
 by tacking on the
 style flag:
https://img.shields.io/teamcity/http/build.myorg.com/s/myapp.svg?style=flat
You may also want to override the label. For example if you have both TravisCI and TeamCity badges you would want to differentiate the two. You can do this by tacking on the label flag:
https://img.shields.io/teamcity/http/build.myorg.com/s/myapp.svg?label=TeamCity
That will produce this:  .
.
 Bender (51 )