Setting Up A .NET Web App As An Identify Provider For Salesforce May, 2015
The following post discusses how to setup Salesforce SSO with SAML and a .NET web application. First off I’d highly recommend looking over these resources:
- Salesforce as a Service Provider (Till about 56:00)
- Salesforce Single Sign-On Implementation Guide
- SAML 2.0 on Wikipedia
SAML Notes
Few things to note:
- Identity Provider (IdP): The application that will be authenticating users. In this post, your web app.
- Service Provider (SP): The 3rd party application that your IdP will be providing authentication for, in this post Salesforce.
- It appears that although Salesforce both supports SAML 1.1 and 2.0, going forward you can only create new configurations with SAML 2.0.
- SAML has the notion of…
- Assertions. We will be creating an “Authentication Assertion” in this post, which is issued by the IdP to tell the SP that the user has been authenticated.
- Bindings. Bindings describe how communication can be done (For example SOAP, HTTP POST, HTTP Redirect, etc). We will be using the HTTP POST Binding.
- Profiles. We will be concerning ourselves with the “Web Browser SSO Profile” in this post.
Generating a Certificate
We need to generate a certificate in order to sign the SAML assertion. This can be done with the certificate creation tool makecert.exe and the pvk to pfx conversion tool Pvk2Pfx.exe. These tools are part of the Windows SDK which can be downloaded here. They can be found under C:\Program Files (x86)\Microsoft SDKs\Windows\*\Bin\. The following command will generate the private key and the certificate which we will provide to Salesforce. You will be prompted for a password for the private key which you can leave blank.
makecert -r -a sha256 -n "CN=My Certificate" -sky signature -sv mycert.pvk mycert.cer
A few notes on the flags:
-rCreates a self-signed certificate.-aThe hashing algorithm used. The default is MD5 which is susceptible to collision attacks.-nThe subject where we specify the common name.-skyThe subject’s key specification, which in this case we will be signing.-svThe filename of the private key we will generate.- And finally the filename of the X.509 certificate we will generate, which contains the public key among other things.
Next we will create a PKCS 12 file which contains the private key and the certificate which will be used in our .NET code to sign the SAML responses. We can delete the private key file after this has been created.
pvk2pfx -pvk mycert.pvk -spc mycert.cer -pfx mycert.pfx
del mycert.pvk
Salesforce Configuration
First you will need to enable SAML, then you will need to add your SAML configuration. You can watch a demo of this here.
-
Go to Salesforce Setup and browse to Administer Security Controls Single Sign-On Settings.
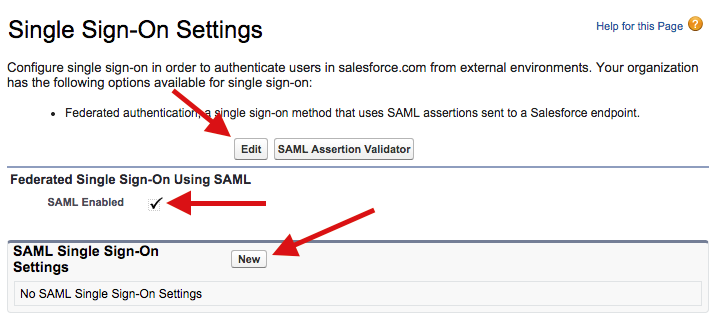
- Edit the “Federated Single Sign-On Using SAML” setting, check “SAML Enabled” and click “Save”.
- Click “New” on the “SAML Single Sign-On Settings” section.
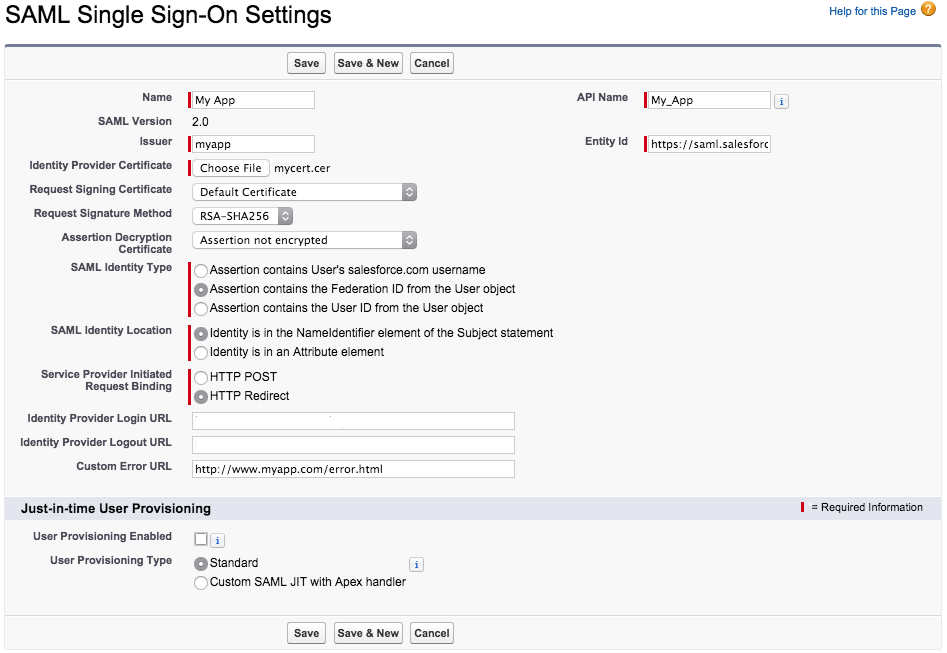
- Enter the SSO Settings and click “Save”. You can find the documentation for this here.
NameThe friendly name of the IdP, can be whatever you want.API NameThe id of the SSO configuration when accessed by the API. This will be auto generated so you don’t have to worry about it.IssuerThis is the issuer that will be specified in the SAML assertion from our IdP. We will discuss this further below.Entity IdThis will behttps://saml.salesforce.comif you do not have a custom domain setup, otherwise you will want to use your custom domain (e.g. a Salesforce sub domainhttps://myorg.cs11.my.salesforce.comor your own domain).Identity Provider CertificateThis is the certificate (.cerfile) we generated in the last section.Request Signing CertificateThe certificate used for signing SP requests. The default is fine unless you want to control expiration.Request Signature MethodThe hashing algorithm used to sign SP requests, chooseRSA-SHA256as SHA1 is susceptible to collision attacks.Assertion Decryption CertificateSet toAssertion not encryptedas we are not encrypting assertions.SAML Identity TypeThis tells Salesforce what kind of user id you are passing it e.g. a Salesforce user name, id or a custom user id from you IdP (Or federation id). In this post we will be passing in a federation id.SAML Identity LocationThis tells Salesforce where to look for the user id in the SAML assertions. In this post we will put it in theNameIdentifierelement.Service Provider Initiated Request BindingThis option indicates how SP initiated SAML requests will pass the request. In other words, if someone clicks a Salesforce link, Salesforce will need to check with your IdP to authenticate the user. Salesforce can either POST the SAML request or redirect and pass the SAML request in the querystring. According to the Salesforce documentation a redirect is recommended as it plays nicer with iOS devices.Identity Provider Login URLThe url where SP initiated requests (i.e. Salesforce links) are redirected to be authenticated by the IdP. We can provide this information in the SAML assertion to we can omit it.Identity Provider Logout URLThe url where users are redirected then they click the logout link in Salesforce to be logged out by the IdP. We can provide this information in the SAML assertion to we can omit it.Custom Error URLThe url where users are directed when there is an error authenticating.User Provisioning EnabledThis indicates whether Salesforce automatically creates new users upon authenticating, if they don’t already exist. I won’t cover that in this post but you can find more about it here.
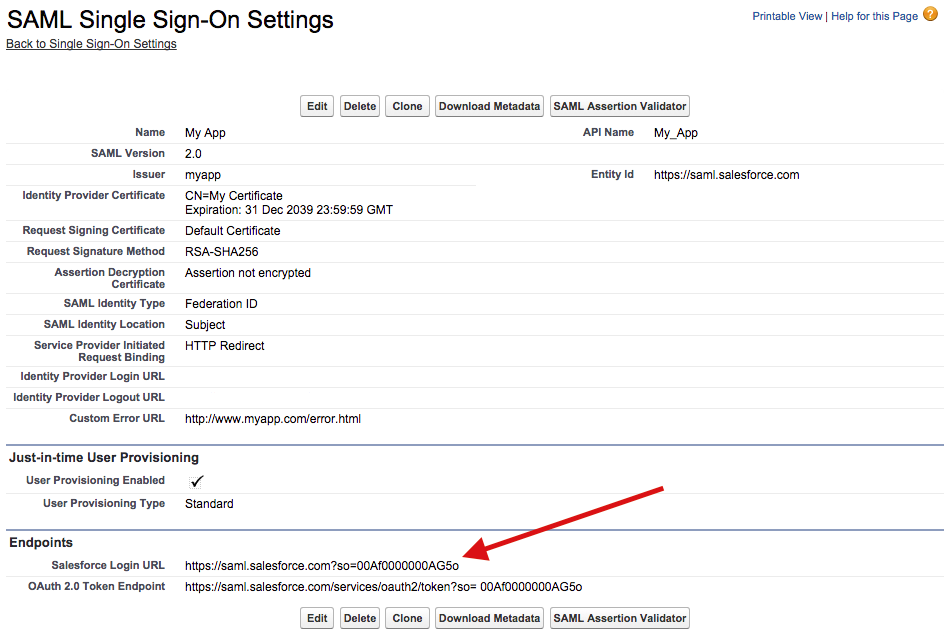
- Once you create your SAML settings you will be taken to a page thats displays the configuration as well as the SSO endpoint you will need to use to login users from the IdP:
Creating the SAML Assertion
In order for a user to access Salesforce, the IdP will need to create and POST a SAML assertion to the Salesforce login url. The following is a SAML assertion with the values specified mustache style:
<?xml version="1.0" encoding="UTF-8"?>
<saml2p:Response
    xmlns:saml2p="urn:oasis:names:tc:SAML:2.0:protocol"
    xmlns:saml2="urn:oasis:names:tc:SAML:2.0:assertion"
    xmlns:xs="http://www.w3.org/2001/XMLSchema"
    xmlns:xsi="http://www.w3.org/2001/XMLSchema-instance"
    xmlns:ds="http://www.w3.org/2000/09/xmldsig#"
    Destination="{{SalesforceLoginUrl}}" ID="_{{ResponseId}}"
    IssueInstant="{{Timestamp}}" Version="2.0">
    <saml2:Issuer>{{Issuer}}</saml2:Issuer>
    <saml2p:Status>
        <saml2p:StatusCode Value="urn:oasis:names:tc:SAML:2.0:status:Success"/>
    </saml2p:Status>
    <saml2:Assertion ID="_{{AssertionId}}" IssueInstant="{{Timestamp}}" Version="2.0">
        <saml2:Issuer>{{Issuer}}</saml2:Issuer>
        <saml2:Subject>
            <saml2:NameID Format="urn:oasis:names:tc:SAML:1.1:nameid-format:unspecified">{{FederationId}}</saml2:NameID>
            <saml2:SubjectConfirmation Method="urn:oasis:names:tc:SAML:2.0:cm:bearer">
                <saml2:SubjectConfirmationData NotOnOrAfter="{{Expires}}" Recipient="{{SalesforceLoginUrl}}"/>
            </saml2:SubjectConfirmation>
        </saml2:Subject>
        <saml2:Conditions NotBefore="{{Timestamp}}" NotOnOrAfter="{{Expires}}">
            <saml2:AudienceRestriction>
                <saml2:Audience>{{EntityId}}</saml2:Audience>
            </saml2:AudienceRestriction>
        </saml2:Conditions>
        <saml2:AuthnStatement AuthnInstant="{{Timestamp}}">
            <saml2:AuthnContext>
                <saml2:AuthnContextClassRef>urn:oasis:names:tc:SAML:2.0:ac:classes:unspecified</saml2:AuthnContextClassRef>
            </saml2:AuthnContext>
        </saml2:AuthnStatement>
        <saml2:AttributeStatement>
            <saml2:Attribute Name="ssoStartPage" NameFormat="urn:oasis:names:tc:SAML:2.0:attrname-format:unspecified">
                <saml2:AttributeValue xsi:type="xs:string">{{IdentityProviderLoginUrl}}</saml2:AttributeValue>
            </saml2:Attribute>
            <saml2:Attribute Name="logoutURL" NameFormat="urn:oasis:names:tc:SAML:2.0:attrname-format:unspecified">
                <saml2:AttributeValue xsi:type="xs:string">{{IdentityProviderLogoutUrl}}</saml2:AttributeValue>
            </saml2:Attribute>
        </saml2:AttributeStatement>
    </saml2:Assertion>
</saml2p:Response>
This assertion is then signed and base64 encoded. The following .NET code does this for you (Signed with SHA256 instead of the default SHA1):
public class SamlAssertion
{
    private readonly byte[] _certificate;
    private readonly string _issuer;
    private readonly string _entityId;
    private readonly string _salesforceLoginUrl;
    private readonly string _identityProviderLoginUrl;
    private readonly string _identityProviderLogoutUrl;

    public SamlAssertion(
        byte[] certificate,
        string issuer,
        string entityId,
        string salesforceLoginUrl,
        string identityProviderLoginUrl = null,
        string identityProviderLogoutUrl = null)
    {
        _certificate = certificate;
        _issuer = issuer;
        _entityId = entityId;
        _salesforceLoginUrl = salesforceLoginUrl;
        _identityProviderLoginUrl = identityProviderLoginUrl;
        _identityProviderLogoutUrl = identityProviderLogoutUrl;
    }

    public string Create(string federationId)
    {
        var saml2AssertionNamespace = XNamespace.Get("urn:oasis:names:tc:SAML:2.0:assertion");
        var saml2ProtocolNamespace = XNamespace.Get("urn:oasis:names:tc:SAML:2.0:protocol");
        var xmlSchemaNamespace = XNamespace.Get("http://www.w3.org/2001/XMLSchema");
        var xmlSchemaInstanceNamespace = XNamespace.Get("http://www.w3.org/2001/XMLSchema-instance");
        var timestamp = DateTime.Now.ToString("o");
        var expires = DateTime.Now.AddMinutes(1).ToString("o");
        Func<string> createId = () => string.Format("_{0:N}", Guid.NewGuid());
        var requestId = createId();

        var attributes = new List<XElement>();
        Action<string, string> addAttribute = (name, value) =>
            attributes.Add(new XElement(saml2AssertionNamespace + "Attribute",
                new XAttribute("Name", name),
                new XAttribute("NameFormat", "urn:oasis:names:tc:SAML:2.0:attrname-format:unspecified"),
                new XElement(saml2AssertionNamespace + "AttributeValue",
                    new XAttribute(xmlSchemaInstanceNamespace + "type", "xs:string"), value)));

        if (_identityProviderLoginUrl != null) addAttribute("ssoStartPage", _identityProviderLoginUrl);
        if (_identityProviderLogoutUrl != null) addAttribute("logoutURL", _identityProviderLogoutUrl);

        var assertion =
            new XDocument(
            new XElement(saml2ProtocolNamespace + "Response",
                new XAttribute(XNamespace.Xmlns + "saml2", saml2AssertionNamespace),
                new XAttribute(XNamespace.Xmlns + "saml2p", saml2ProtocolNamespace),
                new XAttribute(XNamespace.Xmlns + "xs", xmlSchemaNamespace),
                new XAttribute(XNamespace.Xmlns + "xsi", xmlSchemaInstanceNamespace),
                new XAttribute("Destination", _salesforceLoginUrl),
                new XAttribute("ID", requestId),
                new XAttribute("IssueInstant", timestamp),
                new XAttribute("Version", "2.0"),
                new XElement((saml2AssertionNamespace + "Issuer"), _issuer),
                new XElement(saml2ProtocolNamespace + "Status",
                    new XElement(saml2ProtocolNamespace + "StatusCode",
                        new XAttribute("Value", "urn:oasis:names:tc:SAML:2.0:status:Success"))),
                new XElement(saml2AssertionNamespace + "Assertion",
                    new XAttribute("ID", createId()),
                    new XAttribute("IssueInstant", timestamp),
                    new XAttribute("Version", "2.0"),
                    new XElement(saml2AssertionNamespace + "Issuer", _issuer),
                    new XElement(saml2AssertionNamespace + "Subject",
                        new XElement(saml2AssertionNamespace + "NameID",
                            new XAttribute("Format", "urn:oasis:names:tc:SAML:1.1:nameid-format:unspecified"),
                            federationId),
                        new XElement(saml2AssertionNamespace + "SubjectConfirmation",
                            new XAttribute("Method", "urn:oasis:names:tc:SAML:2.0:cm:bearer"),
                            new XElement(saml2AssertionNamespace + "SubjectConfirmationData",
                                new XAttribute("NotOnOrAfter", expires),
                                new XAttribute("Recipient", _salesforceLoginUrl)))),
                    new XElement(saml2AssertionNamespace + "Conditions",
                        new XAttribute("NotBefore", timestamp),
                        new XAttribute("NotOnOrAfter", expires),
                        new XElement(saml2AssertionNamespace + "AudienceRestriction",
                            new XElement(saml2AssertionNamespace + "Audience", _entityId))),
                    new XElement(saml2AssertionNamespace + "AuthnStatement",
                        new XAttribute("AuthnInstant", timestamp),
                        new XElement(saml2AssertionNamespace + "AuthnContext",
                            new XElement(saml2AssertionNamespace + "AuthnContextClassRef",
                                "urn:oasis:names:tc:SAML:2.0:ac:classes:unspecified"))),
                    new XElement(saml2AssertionNamespace + "AttributeStatement", attributes)))
            );

        return Convert.ToBase64String(Encoding.UTF8.GetBytes(
            SignDocument(assertion, _certificate, requestId).InnerXml));
    }

    private static XmlDocument SignDocument(XDocument xdocument, byte[] certificate, string uri)
    {
        const string sha256Algorithm = "http://www.w3.org/2001/04/xmldsig-more#rsa-sha256";
        CryptoConfig.AddAlgorithm(typeof(RsaPkCs1Sha256SignatureDescription), sha256Algorithm);
        var key = new RSACryptoServiceProvider(new CspParameters(24)) { PersistKeyInCsp = false };
        key.FromXmlString(new X509Certificate2(certificate, "", X509KeyStorageFlags.Exportable)
            .PrivateKey.ToXmlString(true));

        var document = new XmlDocument();
        using (var reader = xdocument.CreateReader()) { document.Load(reader); }

        var orderRef = new Reference("#" + uri);
        orderRef.AddTransform(new XmlDsigEnvelopedSignatureTransform());

        var signer = new SignedXml(document)
        {
            KeyInfo = new KeyInfo(),
            SigningKey = key
        };
        signer.SignedInfo.SignatureMethod = sha256Algorithm;
        signer.KeyInfo.AddClause(new KeyInfoX509Data(new X509Certificate2(certificate, "")));
        signer.AddReference(orderRef);
        signer.ComputeSignature();

        document.DocumentElement.PrependChild(signer.GetXml());

        return document;
    }

    // Pulled from .NET 4.5+
    public class RsaPkCs1Sha256SignatureDescription : SignatureDescription
    {
        public RsaPkCs1Sha256SignatureDescription()
        {
            KeyAlgorithm = "System.Security.Cryptography.RSACryptoServiceProvider";
            DigestAlgorithm = "System.Security.Cryptography.SHA256Managed";
            FormatterAlgorithm = "System.Security.Cryptography.RSAPKCS1SignatureFormatter";
            DeformatterAlgorithm = "System.Security.Cryptography.RSAPKCS1SignatureDeformatter";
        }

        public override AsymmetricSignatureDeformatter CreateDeformatter(AsymmetricAlgorithm key)
        {
            var asymmetricSignatureDeformatter = (AsymmetricSignatureDeformatter)
                CryptoConfig.CreateFromName(DeformatterAlgorithm);
            asymmetricSignatureDeformatter.SetKey(key);
            asymmetricSignatureDeformatter.SetHashAlgorithm("SHA256");
            return asymmetricSignatureDeformatter;
        }
    }
}
This class has 6 constructor parameters:
certificateThis is the.pfxfile we generated above.issuerThis is the issuer we specified in the Salesforce SAML configuration. Doesn’t matter what this is as long as it matches whats in Salesforce.entityIdThis is the entity id we specified in the Salesforce SAML configuration.salesforceLoginUrlThis is the login url that Salesforce generated for us in the Salesforce SAML configuration (Under Endpoints).identityProviderLoginUrlThis is an optional url where users are sent if they need to login, should be your IdP login page.identityProviderLogoutUrlThis is an optional url where users are sent if they click the logout link in Salesforce.
The Create method takes a federation id and builds the assertion. Assertions are time sensitive and must be used immediately or they will expire. So do not generate an assertion to be used later.
HTTP POST Binding
Now that we have everything configured and have a way to generate assertions, we need to be able to POST the assertion to Salesforce. The form is defined as follows:
<form method="post" action="https://myorg.cs21.force.com/customers/login?so=00AA0000000DDbb">
    <input type="hidden" name="SAMLResponse" value="aHR0cDovL2JpdC5seS8xR3YwRzc0..." />
    <input type="hidden" name="RelayState" value="https://myorg.cs21.force.com/customers/888f00000000abc" />
</form>
The SAMLResponse is the assertion we generate above. The RelayState is an optional landing page in Salesforce.
As noted earlier, we need to generate the SAML assertion on the fly and not simply render it in a web page to potentially be clicked later. One way we can accomplish this is by adding an endpoint that generates the SAML assertion and then dynamically create the form on the client side and submit it (Unfortunately we can’t simply ajax POST as this violates the same-origin policy). So first, we need to create an endpoint along these lines:
public class SamlController : Controller
{
    public string Assertion()
    {
        return new SamlAssertion(
            Assembly.GetExecutingAssembly().GetEmbeddedResource("mycert.pfx"),
            Configuration.Saml.Issuer,
            Configuration.Saml.EntityId,
            Configuration.Saml.SalesforceLoginUrl,
            Configuration.Saml.IdentityProviderLoginUrl,
            Configuration.Saml.IdentityProviderLogoutUrl)
            .Create(Token.Current.Username);
    }
}
On the client side we can pass our salesforce url’s into the view. When the link is clicked, a SAML assertion is generated and returned. A hidden form is dynamically generated, submitted and removed.
<a href="#" id="salesforce">Login to Salesforce.</a>

<script>
    var salesforceLoginUrl = '@ViewBag.SalesforceLoginUrl';
    var salesforceStartUrl = '@ViewBag.SalesforceStartUrl';

    $(function () {
        $('#salesforce').click(function() {
            $.get('/saml/assertion')
            .done(function (data) {
                var form = $('<form>', {
                    'method': 'POST',
                    'action': salesforceLoginUrl,
                    'target': '_blank',
                    'style': 'visibility: hidden'
                });

                form.append($('<input>', {
                    'name': 'SAMLResponse',
                    'value': data
                }))
                .append($('<input>', {
                    'name': 'RelayState',
                    'value': salesforceStartUrl
                }))
                .appendTo('body') // Required for FF
                .submit();

                form.remove();
            });
        });
    });
</script>
And there you have it! If you are having trouble, be sure to check out the SAML Validator. It will contain the assertion from the last login attempt and display any errors. Also checkout the SAML login history to see a list logins and any errors.
 Bender (51 )